For a general explanation of what MDC is, see the main page MDC
The device described here is a small stepper driver that could be used with smaller types of stepper motors that pull a maximum of 500mA per coil when active.
A lot of lighting devices use these steppers for instance to turn a colorwheel or a small mirror. They are not fast, but do get the job done.
If a bigger NEMA stepper is used, a larger driver is needed and this is not the stepper driver you are looking for..
This device simply takes 1 channel to control a stepper motor. This can be any motor really, as long as the correct pins are set in the code.
The code presented here is aimed at a colorwheel with 9 positions on it (0 = blank, 1 - 8 are different colors).
It is however easy to understand what is going on and changes to suit other needs should not be hard.
The hardware can be anything that can drive a stepper. This ranges from a simple driver like the ULN2003 chip or a complete heavy duty controller specially made for the stepper you are using.
There really is no limit to this, or the size of the stepper, as long as you take care it is driven correct and nothing weird can happen when there is a loss of signal.
When using larger steppers, it is adviseable to provide a power supply specially for driving the stepper motor instead of only relying on the power provider by the MDC signal. For smaller steppers (say: up to
12V 1A per coil) this shouldn't be a problem though.
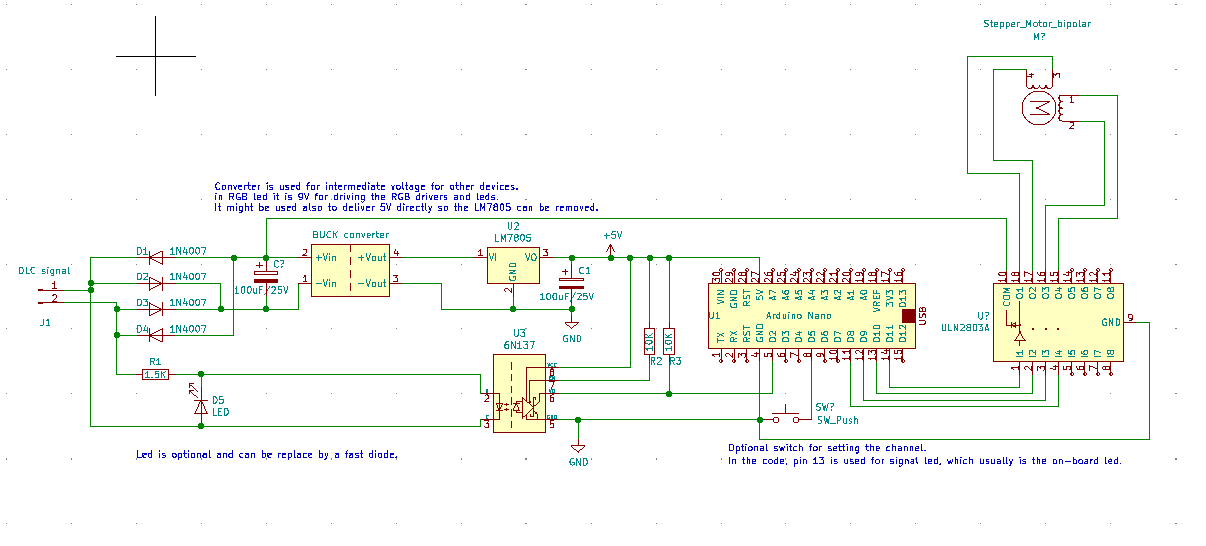
The device itself is based on the default client hardware. The circuit is displayed below. All free ports are available for driving the stepper motor(s).
As is visible, there are ports enough on the arduino and on the uln2803 to attach a second stepper motor, but here only one is used.
There are actually 2 parts to the code when using it as is to drive a colorwheel.
Programmer code
First is the 'programmer'.
This is used to set the exact number of steps for each color on the wheel. Some wheels have small deviations from a uniform division, so the number of steps micht differ a little bit.
The code lets you do just that: go through all positions and alter the steps by keyboard input.
Once done, it is able to save the settings in EEPROM for later use in the running code.
Please check the code comments in the ino file, they will show how to use the code and the commands to set the correct steps etc.
Download the code: setsteps.ino
Running code
This code is loaded in the arduino and stays there. It uses the stored setting of the programmer code so the steps are correct.
There are 2 versions of the code. They both serve their purpose:
- V1 uses 2 channels.
Channel 0 is used to tell the color by assigning each color a block of 30. Meaning: 0 - 29 is color 0, 30 - 59 = color 1, etc.
Channel 2 is used to zero the stepper, if the value is over 200, it will run the zeroing routine.
-
V2 uses just one channel.
This channel is used as:
- 0 - 19 = auto mode
- 20 - 199 = color selection in blocks of 20
- 200 - 220 = does nothing, free to use
- 220 - 255 = zero the stepper
This version has an 'auto mode'. This is the default startup mode and whenever the DMX value is less than 20.
What it does is change itself to a random color, displaying it a random time, then moving to another color.
It is mainly for color gobo's in lights. The nice thing about this is: given the circuit, you can use 12V DC as the power source! The light will start, zero the stepper, and continue in auto mode without having to set anything!
Ofcourse, both can be programmed by holding the pushbutton for around 3 seconds, then moving the channel on the controller you want to assign it.
After some changes have been detected, the channel is set and stored in eeprom.