Rollerbench
When starting with any model rail, you really do need a rollerbench. It makes checking locomotives a whole lot easier! You can test them and see how they run.
If you plan to use DCC, it's also nice to have as a 'programming rail' for dcc locomotives.
Looking around, the 'professional' ones do cost quite a lot of money and considering my idea of building a layout on a budget, I figured: i'd make one myself.
For this, i wanted to use only cheap to get or make parts or using 3d printed parts, since i have a 3d printer.
3D printing is chosen over drilling for instance, considering that things do have to be in-line pretty precise and drilling on a standard drillpress is not exact to 0.1 mm...
Below is explained what i came up with.
Parts
First, what parts does this project use. Below are listings of general parts and seperate listings per scale. The available scales are O, H0 and N scale.
Universal parts, all scales
Name
Amount
Where to get
approx. cost
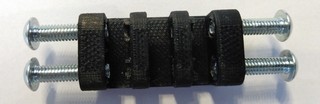
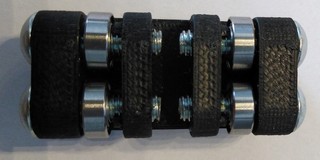
miniature ballbearings, type MR84ZZ
this means: 4mm inner diameter, 8mm outer diameter. These are 3mm wide.
Electrical wire, long enough to reach the controller
1
Local hardware store
€ 4,- for about 5 meters of 2.5mm/sq. flexible 2 pole wire (speaker wire, the least amount the shop has here)
If you have trouble finding the bolts in your local hardware store, you can also find the ones i used on several well known marketplaces online. Just search for: "M4 ISO7380".
Other models will also do, but i like the look of these ones the best.
I used nickel plated, but stainless would probably work also.
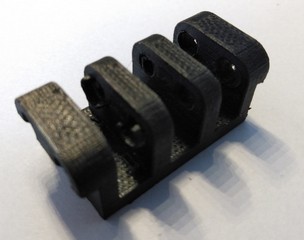
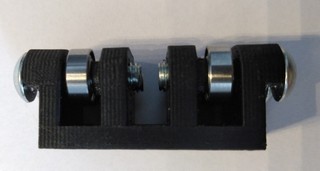
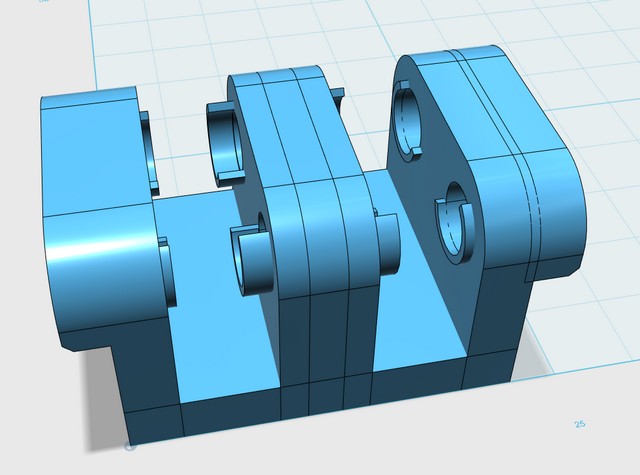
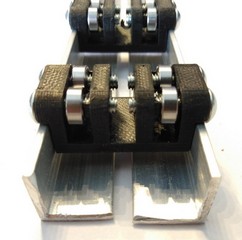
Bearingblocks
First of all, print the number of bearingblock you want. You can print them straight up, with minimal support.
I prefer to print ABS, which the model takes into account. The outer holes fit the M4 bolts snug, the inner holes fit tight, so no nuts are needed.
On my 3d printer (a zortrax m200), i set it up with 6 top and bottom layers, 0.09 layer thickness, using raft, 30% infill using patt.0 (the simple squares). The supports i set to smart bridges and lite, but no offset.
Making it a solid (100% infill) is possible but not needed.
After printing, simply clean out the holes. You can clear the outer holes to 4mm, but make sure that the inner holes are not! The bolt should grip the plastic so it will sortof cut it's own thread and not drop out.
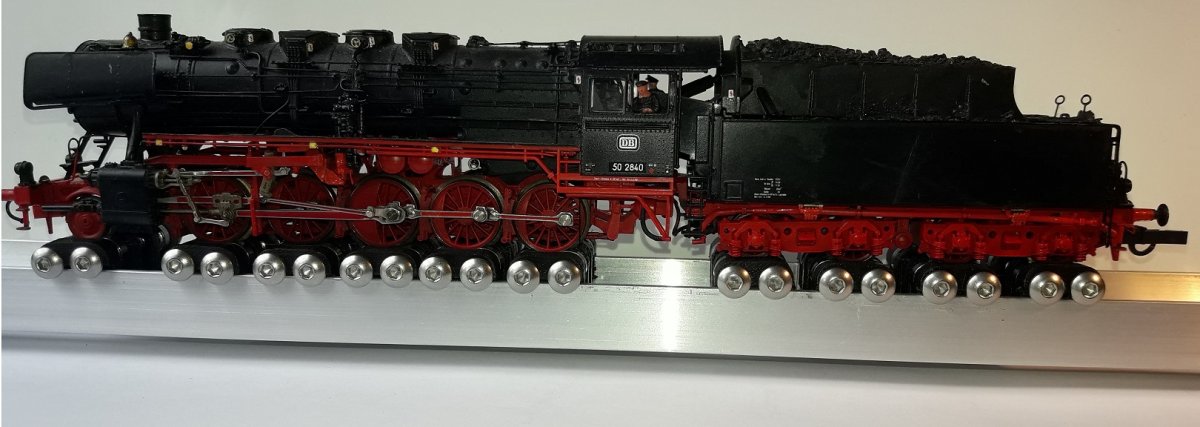
It is a bit fiddly, but the endresult is as on the picture below.
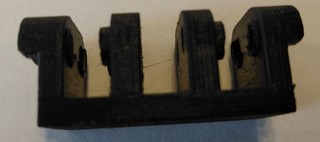
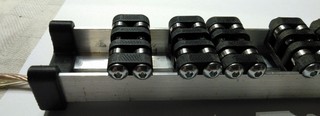
H0 scale
I only made the H0 scale parts so i have pictures of those:
N scale
The N scale blocks are smaller in width, so they will need shorter bolts to prevent a shortcircuit. M4 X 10 is an available standard size that will work.
Be carefull not to drill out the outer holes to 4mm with these blocks, since the 10mm long bolts will not reach the innerpart! You can either get a thread cutter tool for M4, or carefully let the bolt 'cut' it's own threads in the outer holes.
These blocks look slightly different:
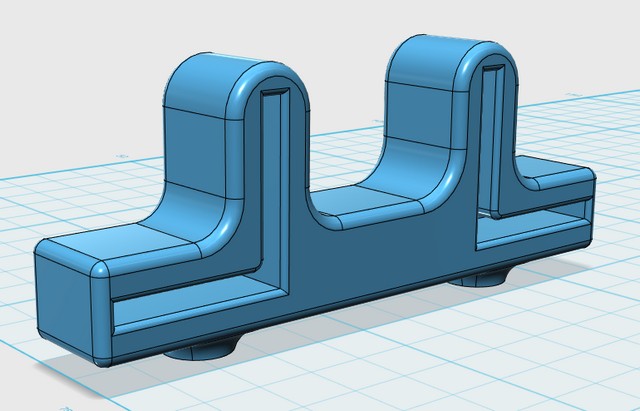
O scale
O scale is about double the scale as H0 as far as gauge goes. This means a considerable wider track width: 32mm! The flange of the wheels is just 1.6mm maximum according to standards, so we can still use the
same bearings etc. as with H0 scale.
To make sure the wheels stay in between the bearings, the bearings are spaced 1mm wider than H0.
For more stability, an extra bar is added in the middle so it will not sag or droop when a heavy locomotive is put on the blocks.
Again, i did not print these but if i hear any good updates and tips i will update the models accordingly.
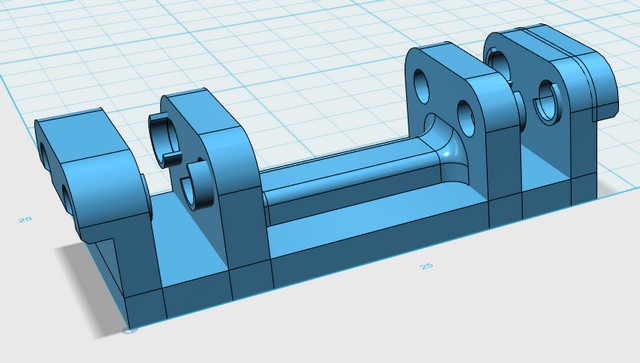
Rail
The rail is constructed using 2 lengths of aluminium corner profiles and some printed parts. Before printing, make sure the measurements are correct: if you lay them as is seen on the picture, the measurement in between the upright walls should be at least 30mm so a bearingblock fits loose in between them.
For the mentioned aluminium corner of 15x15mm, 2mm thick, the endcaps can be printed. Make sure you print them with the slots pointing up!!
It is impossible to remove any support that is printed in the tight slots. Also any supports in the 1mm cable holes will be impossible to remove without a 1mm drill, but since it's just 1mm it should be able to be printed without any support there.
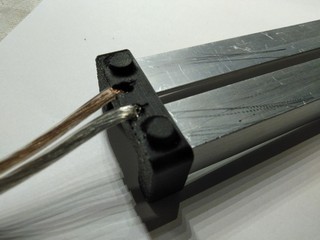
Connecting the rail to power can be done in 2 ways:
Before tapping the rail into the endcaps, strip off about 10mm of the electrical cable and stick it through the holes in the endcap. This only has to be done on one end of the rail, but on that end both holes need a cable.
Then proceed to tap in the aluminium profiles, making sure they are all the way in. Use a multimeter to check if the wire makes contact.
Drill a 4mm hole in each rail on one end, making sure the hole is away from the end enough to not 'dissappear' into the endcap. The depth of the slots is 7mm.
If you use 4mm bolts, the holes should be at least at 12mm from the edge to provide enough room for the nut. Then, using the bolts, tighten the wire to the rail.
With either choice, the rails should be press-fitted into the slots in the endcaps. Use a hammer to tap them in, but do not hit it too hard, multiple soft taps will prevent the part from breaking.
Once fitted, there shouldn't be any other fasteners needed to keep things in place.
H0 scale
Again, i only made the H0 scale parts, here's the pictures:
N scale
For N scale, the aluminium profiles are just a little to wide. So they are used the other way around, the bottom side points out instead of inward.
Everything else is the same, so these also have the holes to fit the cables.
O scale
For O scale we can use the same profiles. They should be able to cope with the heavier rolling equipment without an issue. The endblocks are considerable wider, so they have an extra support in the middle.
Otherwise, the positioning of everything is the same, so is putting it together.
I did not print this design but will update the models if i receive feedback on improvements.
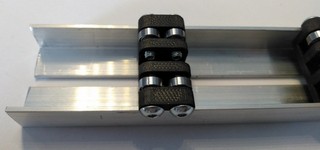
Using
If everything turned out right, we have a complete rollerbench with very low friction. To test a locomotive, just put the bearingblocks where they should be supporting a wheel, switch on the power, and see it working!
(image and demo movie courtesy of François @ beneluxspoor.net forum!)